Oak Leaf Types: Lobes, Tips, Sinuses, and Acorn Clues
Practical photo clues for oak leaf types: which leaf features are reliable, which are weak signals, and how to compare matches before confirming.
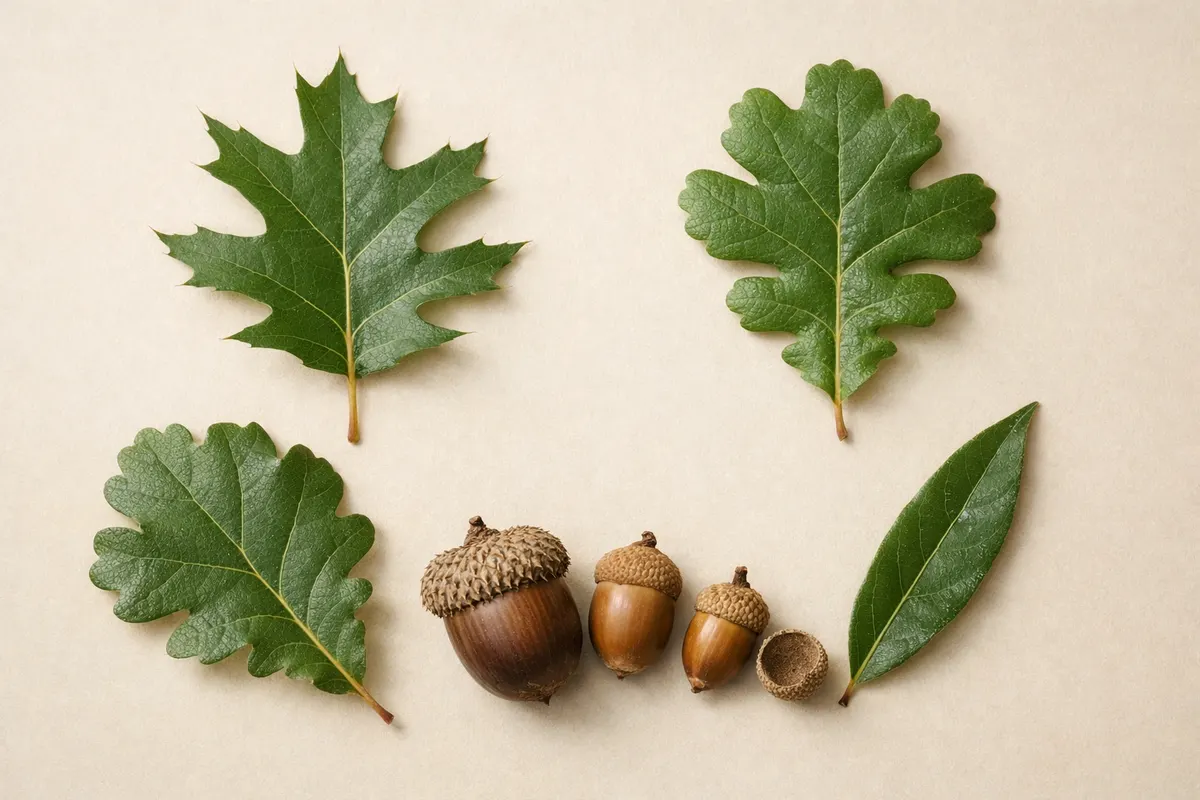
Quick answer for oak leaf types
Oak leaf types are most reliably sorted by the leaf outline: the number and shape of lobes, the depth of sinuses between lobes, and the shape of lobe tips (rounded versus pointed). Those broad silhouette features survive most ordinary phone photos and are the fastest clues to separate major groups like white-oak types and red-oak types.
Secondary, corroborating evidence includes vein pattern and petiole attachment (how the leaf joins the twig), the presence and shape of teeth or bristle tips, underside hairiness, and—when available—acorn size and cap details. Together, these features let you narrow likely matches without pretending a single trait is proof.
Practical limits: color, small surface textures, and fall hues are weak signals and vary with age, season, and lighting. Use visible clues from multiple leaves, and treat any single-photo match as a working hypothesis until you can check acorns, twigs, or multiple seasons.
Strongest visual clues
Focus first on the overall silhouette—the easiest, most durable clue in photographs. Count lobes, note whether lobes are deep or shallow, and record whether the sinuses (the indented spaces between lobes) cut close to the midrib or stay broad. These patterns distinguish large groups of oak leaf types even when color and surface detail are obscured.
Lobe tip shape is the next most reliable single trait. Rounded lobe tips (no bristle) commonly point toward white-oak–group species; sharp or bristle-tipped lobes usually indicate red/oak-group relatives. Look at multiple mature leaves rather than a single young one: juvenile leaves can be misleading.
Acorn and cap features often confirm a leaf-based guess. If you can photograph acorns, note their relative size, whether the cap covers half the nut or less, and whether cap scales are tight and knobby or loose and shaggy. Acorn traits are slower to appear in the field but are highly diagnostic when present.
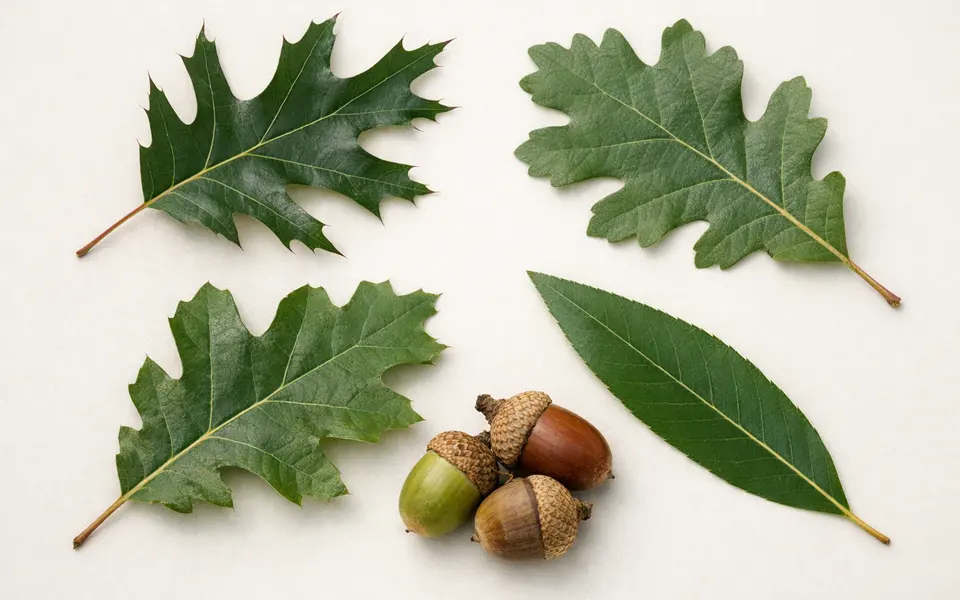
- Lobe count and pattern — Work from the full leaf outline. Deep, narrow sinuses plus many narrow lobes point to certain red-oak types; broad, rounded lobes with shallow sinuses suggest white-oak types.
- Lobe tip shape — Rounded tips without bristles (smooth lobes) suggest white-oak relatives; pointed lobes with tiny bristles suggest red-oak relatives. Photograph the leaf edge against neutral background to check tips.
- Sinus depth — Measure sinus depth visually: shallow sinuses keep lobes broad; deep sinuses create distinct finger-like lobes. Deep sinuses reduce the visible blade width and are a strong separating clue.
- Primary veins and vein forks — Pinnate veins that extend into each lobe and form clear vein-to-lobe relationships are stable in photos. Note whether secondary veins diverge sharply toward lobes or run more gently.
- Petiole and base attachment — Observe whether the leaf blade tapers to a petiole or has a rounded/cordate base. The way the blade meets the petiole and the presence of a short stem can rule out lookalikes.
- Acorn and cap details — Photograph any acorns in context. Cupule scale texture (smooth, knobby, or overlapping plates), cap depth, and nut size relative to the cup help separate species that otherwise look similar by leaf alone.
- Twig, bud, and branching context — When available, show the twig and bud arrangement. Bud shape and twig texture are steady clues that complement leaf shape for confident narrowing.
Weak signals
Color alone is a weak signal. Leaf hue shifts across seasons, exposure, health, and camera white balance. Don’t rely on green shade, gloss, or fall color as decisive evidence for oak leaf types unless you have additional structural clues.
Surface texture and tiny hairs are easy to lose or misread in ordinary photos. Understory lighting, reflections, and focus issues hide hairs and glandular dots. Treat fine pubescence or tiny serrations as supporting evidence only when visible in close, sharp images.
Single-angle photos, very young or very old leaves, and damaged specimens are misleading. Juvenile leaves may have extra teeth, and insect or mechanical damage can mimic sinuses and lobes. Always try to photograph multiple mature leaves from different parts of the crown.
- Fall color — Useful for seasonal description but inconsistent and not diagnostic across many oak species.
- Gloss and wetness — Shiny surfaces can look like a different texture under sunlight; avoid using gloss to make identification decisions.
- Juvenile vs. mature leaves — Young trees and sucker shoots often show different lobing and teeth than mature canopy leaves.
- Single specimen bias — One odd leaf does not define a tree; sample three to five mature leaves before concluding.
Comparison workflow
Build a short checklist you can complete with your phone before trying to match a species. Start with silhouette: take a photo of the whole leaf on a neutral background for shape and lobe count, then photograph the blade edge close-up to capture tip shape and sinus outlines.
Add complementary shots: an underside or oblique photo to show vein prominence and hairiness, a clear shot of the leaf base and petiole, and, when possible, acorn(s) on the ground or on the tree plus a twig with buds. Each additional view turns a tentative match into a stronger hypothesis.
Narrow by elimination rather than by single-click certainty. Use silhouette to reduce the field to a handful of likely species, then apply acorn, vein, and petiole clues to eliminate mismatches. If regional knowledge rules out some species, use that context—but don’t let it override observable leaf features.
- Step 1 — Photograph: whole leaf on neutral background; close-up of lobe tips; underside; petiole and twig; any fruits (acorns).
- Step 2 — Note context: approximate location (city/region), habitat (dry ridge, wet bottomland, urban street), and tree size/shape.
- Step 3 — First-pass split: separate leaves into rounded-lobed (white-oak group) vs. bristle-tipped/pointed-lobed (red-oak group).
- Step 4 — Use acorn and cap features to confirm or rule out species within the group. If acorns are missing, rely on vein pattern and petiole details.
- Step 5 — Treat your match as a research note: record confidence level and what additional photos or seasonal checks would improve it.
App workflow
After collecting the checklist photos and notes, use Leaf Identification: Leafzy as a first-pass aid to compare your evidence against reference images. Present multiple photos (whole leaf, edge, underside, twig, and acorn) rather than a single close-up—this increases the app’s chance of suggesting helpful candidates.
Include a visible scale in at least one photo (a coin or ruler) and a short note about location and habitat when the app prompts for context. That contextual data helps prioritize likely regional species without pretending the app can prove identity from one clue.
Treat the app’s suggestions as research leads. When the app suggests matches, compare its candidates against your strongest clues—the lobe silhouette, sinus depth, lobe tip shape, and any acorn features. If suggestions disagree with those features, gather more photos or save the result as a tentative note for later verification.
- Tip photo set — Whole leaf (neutral background), edge/tip close-up, underside, petiole/twig, acorn if available.
- Metadata helps — Time of year, location (general), and habitat increase relevance for regional species.
- Interpret results carefully — Use app candidates to guide further observation; do not treat a single app match as definitive.
Related guides
Try Leaf Identification: Leafzy after your clue checklist
Use Leaf Identification: Leafzy on iOS as a first-pass tool after you’ve photographed whole leaves, edges, undersides, twigs, and any acorns. Treat the app’s suggestions as research leads—note confidence and gather more photos or seasonal checks before deciding. For broader visual-check tips, see the Plant Identification Cheat Sheet for a compact reminder.

Frequently asked questions
How do I tell white oaks from red oaks by leaf clues?
White-oak–group leaves usually have rounded lobes without bristle tips and shallower sinuses, producing a softer silhouette. Red-oak–group leaves tend to have pointed lobes with tiny bristles at the tips and deeper sinuses. Use several mature leaves to confirm the pattern; mixed signals sometimes occur on young shoots or hybrids.
Can I identify an oak from a single acorn?
An acorn alone can narrow the list—cap texture, cap depth, and relative nut size are diagnostic for many species—but it’s rarely definitive by itself. Pair acorn features with leaf silhouette and twig/bud traits for a reliable identification.
What if the leaf is damaged or has insect holes?
Damaged leaves often mislead by creating false sinuses or altered lobes. Photograph several intact mature leaves from different branches. If damage is widespread, look for undamaged leaves lower in the crown or on nearby trees of the same species.
When should I seek further verification beyond photos?
Seek further verification if you need a precise species name for research, legal, or safety reasons. Collect fruit (acorns), twig samples with buds, and multiple-season observations when possible, and compare findings against reliable local floras or expert resources before making a final determination.